- Our system is integrated with endicia.com for your Bulk Shipping needs. Endicia has two programs that look vastly different, but have the same functionality.
- DAZzle for Windows users
- Endicia for Mac users
- The Defaults you create in Shipping Settings, generate the XML file that Endicia needs to correctly charge your postage.
- Download the file you generate, save it to your machine, and upload it to Endicia.
- The file you receive back from Endicia is then uploaded back to AOB to confirm your orders on your venues.
Upload your completed DAZzle XML Output File
DAZzle XML Settings
Order List
Get DAZzle XML File
Instructions
Layout Template and Output file placement
Bulk Ship for Mac
Rubber Stamps
Upload_your_completed_DAZzle_XML_Output_File
At the top of the Bulk Ship page is where you upload the file you receive back (aka output file) from Endicia after printing your postage. Uploading this file will allow AOB to capture your Tracking, send confirmations to your venues, mark your orders as shipped, and send confirmation emails to your buyers.

DAZzle XML Settings
To begin start with these settings and work your way down the page.

- Advance the postmark by a set number of days or leave it at 0 (zero) for that days postmark.
- Test print only.
- Override the Delivery Confirmation Default created in Shipping Settings.

Order List
Your orders will be displayed in a table like the one below. Note that each cell contains a brief description of what you will see in each column of the Order List:
| SKU/Title | Address | Mail Class | Package Class | Weight | Size | Custom Form |
|---|---|---|---|---|---|---|
| Order ID, SKU, Title, Pkg#, Order Value and Shipping Credit | Buyer's Address | Mail Class drop-down menu to select your Shipping Speeds and whether or not you want to require a signature confirmation. (Note that the signature confirmation is an extra charge at USPS) | The drop-down menu contains Envelope, Rectangle Pkg, etc... | Entered in Pounds and Ounces | Width, Length, Height, and if the pkg is non-Machinable or Oversized | International orders will populate this field for the Customs form type, Qty, Weight, Description, Value, Country of Origin, Contents, and the Signer |
"Save Shipping Choices" updates the page and generates the DAZzle XML file with the selected values.
- For detailed steps see "Instructions" below.
Get DAZzle XML File
- Once saved there will be a link to your DAZzle file beneath the the save button:

- Right-click that link to open your browser menu and choose the Save As option for your browser to download your DAZzle XML file.
- Depending on the browser you may need to change the extension of the file to .xml before saving.
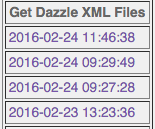
- You will also see a table of previously generated files so that you can access them for up to 10 days.
Instructions
Once you have set up the Shipping Settings there are 2 different ways you can set up your bulk shipping for Windows users.
We'll go through the steps for the basic method first:
- Get your items that you are going to be shipping all together and ready to go.
- Go to your Bulk shipping page.
- Enter weights for each item (if not entered when the item was listed) and ensure the correct Shipping Method is selected for any orders not using the default settings.
- Click the Save Shipping Choices button at the top or bottom of the page to create the XML file that Dazzle needs.
- Right-click on the Get DAZzle XML File heading and choose the Save As option in your browser menu to save this file on your machine.
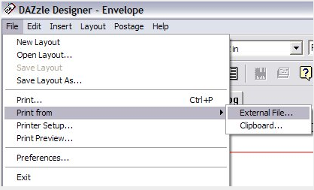
- Now open DAZzle and at the top of the page click File then Print from which opens a sub-menu where you click External file.
- To locate the XML file on your computer use the drop-down box next to File Type and select text, XML format to be able to see the file you need, find the file on your computer click on it, or type it into the file name fields then click Open.
- This will bring up the Print Postage option. When you click print another box will open that says, “Because you are printing from an XML-based file, DAZzle Designer 2005 will create an XML results file with the postage information for all printed items.”
- You will be prompted to select the name of the output file in the next dialog.
- Click ok.
- The next box that pops up is where you want to save the Output File.
- Come back to AOB's Bulk Ship page and upload your Output File using the Upload your completed DAZzle XML Output File option to populate any Tracking Numbers, Actual Postage amounts, and send the Delivery Confirmation emails. This last step is necessary for AOB to record this information in your AOB account and to send the delivery confirmations and tracking numbers (if you have chosen to use them) to your venues.
Layout Template and Output file placement
- Set up your AOB account and DAZzle on your Shipping Settings page.
- Enter a DAZzle Layout. The layout file name is the DAZzle layout you use to print your postage.
- Enter the DAZzle Output to tell Endicia where on your machine you are storing this file. For Windows people, we suggest something like C:\dazzleoutput.xml.
- Go to the Bulk Ship page on AOB.
- Go down the order list and your book stack and put each order in its envelope and weigh it. Enter this weight in the Weight column. If you would prefer to work in just ounces, enter the ounces in the ounces slot and the system will calculate the pounds/ounces split. If you entered the shipping weight when the item was listed this step is not necessary.
- Select the shipping method as you are going down the list as well.
- Verify the shipping methods to use. For example, this is where you can change your shipping for one sale from Media Mail to Priority Mail.
- Click "Update Shipping Choices" and our system will poll the United States Postal Service for international shipping rates so you can select from the available methods based on the shipping cost. Because we'll need to poll the USPS for the international rates make sure you enter the weight for those items before clicking "Update Shipping Choices". You can then go back and select the one you need. Don't forget, if you change any shipping options to click "Update Shipping Choices" to have your DAZzle XML file updated.
- Right click the on the Get DAZzle XML File link and choose the Save As option in your browser menu to save this file in the directory you setup in Step 1 to have DAZzle check for the XML file.
- Print your postage. When this has been completed there will be a new Output File stored under the file name you set up in Step 1 under DAZzle Output File name.
- Upload this file using the Upload Your DAZzle XML Output File line on the Bulk Ship page. Depending on how long your shipping list is, this page might take a few seconds to load as it updates your orders and sends confirmation emails to your customers and the selling venue.
- Stick your labels and/or stuff your envelopes and you're done!
If you have problems, just let us know and we'll be here to help you out. Just remember, don't panic. Once you get it working right, it gets easier.
- Go to Settings > Shiping Settings
- Leave the layout box blank, but in the output field box put: ~/Desktop/out.xml (Be sure to save changes at the bottom of the page.)
- Go to the Bulk Ship page
- On the Bulk Ship page go down the list and enter the weight for each item. This step is not required if you entered the shipping weight when you listed the item. Save shipping changes when you have finished the list.
- Right-click the “Get Dazzle XML” link and save the link as .xml (it may show up as .xml.txt – if so change it to .xml).
- Go to Endicia > File > Print from external xml file. A new window will open, just scroll down until you find 'get_dazzle_file.xml' and click on it, then click on the open button. Sit back and watch your labels start to print.
- When labels stop printing go back to the Bulk Ship page in your AOB account and click the “Browse” button to locate the out.xml file (it will be on your desktop). When you find it click the “upload” button. That will update your ship page, and emails with tracking numbers (if you choose to use them) will be sent to your customers and shipping confirmations with tracking numbers will be sent to the selling venue.
Rubber_Stamps
Want something printed on the label so you can identify the package? You need a rubber stamp. Here's a list of each of them.
Rubber Stamp 1 = SKU
Rubber Stamp 2 = Order ID
Rubber Stamp 3 = Title
Rubber Stamp 4 = Qty
Rubber Stamp 5 = Purchase Date
Rubber Stamp 6 = Ship Method
Rubber Stamp 7 = Price
Rubber Stamp 8 = Location
To set them on DAZzle:
- Click the rubber stamp icon on the tool bar in DAZzle.
- Click the button next to Display reference field
- Select the RubberStamp number you want.
- Click OK on the bottom of the dialog box
- Click on your label where you want the rubberstamp to appear.
FYI for Mac users: Endicia only supports two rubber stamps, #1 and #2.
If you want to use one of the two rubber stamps follow these steps:
1. Go to Endicia that you have downloaded to your computer.
2. Select preferences under the Endicia menu.
3. Select Mailpiece.
4. Click on the Top Custom Field or Bottom Custom Field depending on whether you are using a plain paper printer of a thermal printer.
5. Select the Rubber Stamp you want to use.
7. That is all there is to it but we suggest that you test your new layout before printing actual postage.
Comments
dymoendicia link doesn't work. No such link is at that URL
And corrected. Thanks much!